更多Android高级架构进阶视频学习请点击:https://space.bilibili.com/474380680
apk加固原理之dex加密
原理其实不复杂,加固其实就是加密dex文件,防止dex专程jar 被阅读。后面才是热部署解密dex;
一、加密和解密方案
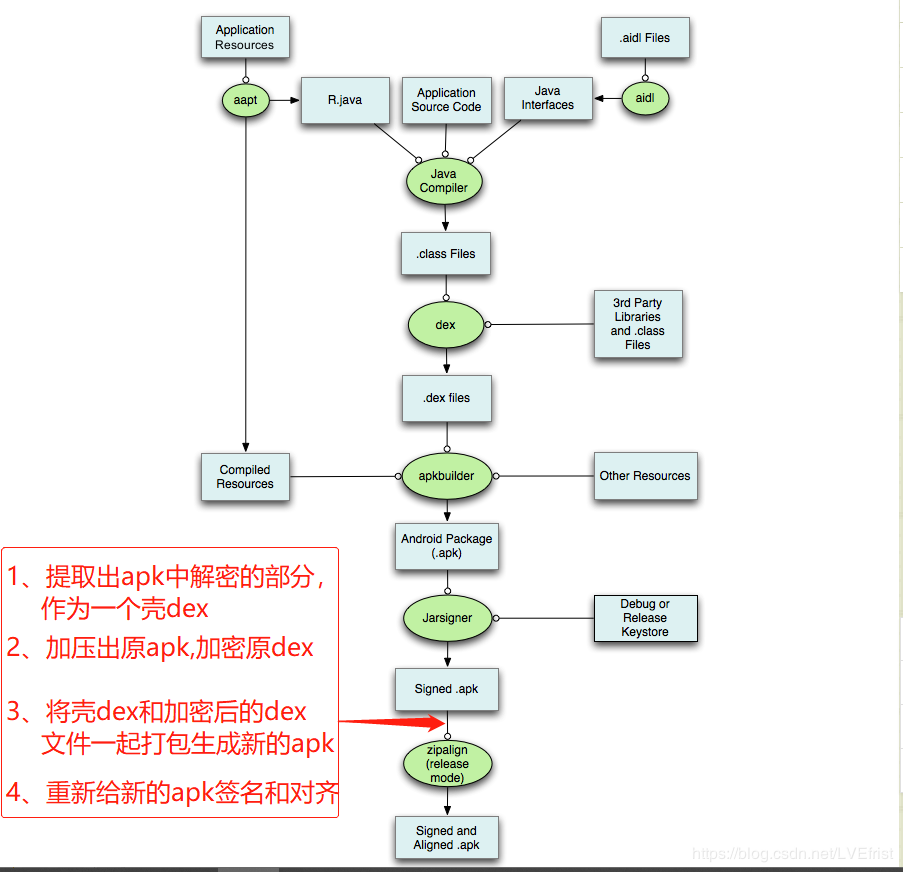
既然我们已经弄清了apk是如何打包的,那么将加密流程加到整个打包流程就相对清晰了。如下图
什么?还是不懂呢?那来看看我们整个加密和解密方案呢?
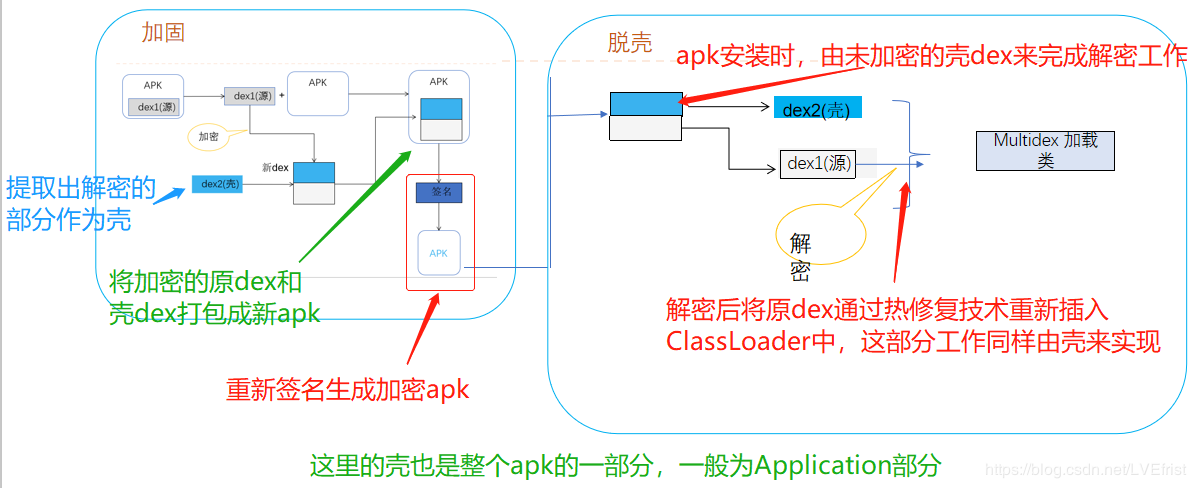
我们的思路如下:
既然我们要加密,那么必然有解密,但是这个解密又必然是整个应用的一部分,但是连这部分都加密的话,那么系统就完全无法解析我们的应用,也就是完全无法安装了。所以我们需要将解密的部分提取出来单独作为一个module,且这个module是不能够被加密的。然后最好的解密时机就是首次启动应用的时候进行,所以Application自然成了我们负责解密的首选。那么是否意味着原apk中不能有这个module呢?答案是:错啦。原apk中同样要将这个解密module打包进去,否则原apk也无法编译通过啊。
我们都知道,系统在加载类的时候都是从我们apk的dex文件中加载的。ClassLoader会去维护一个这样的dex文件数组(这个在前面的热修复章节有介绍过)。而我们要做的就是将原apk中的dex都加密,然后将解密部分的代码单独编程成dex文件(我们称这样的dex为壳dex)连带着加密的dex一起加到新apk中。这样新apk安装后系统就能够找到我们应用启动的入口Application了,不至于由于加密导致系统找不到应用程序入口。而在这个程序入口中我们要做的就是解密被加密的dex文件,然后重新插入到ClassLoader维护的dex文件数组中(这里就涉及到大量的反射知识)。
三、加密实现
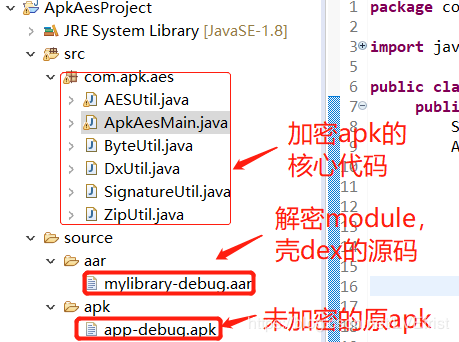
方案说了那么多,到底如何实现呢?实现后到底能不能像我们说的那样正常安装运行呢?撸代码来验证!
先来看看我们加密工程未运行前的结构图
再来看看工程运行后,工程结构的变化
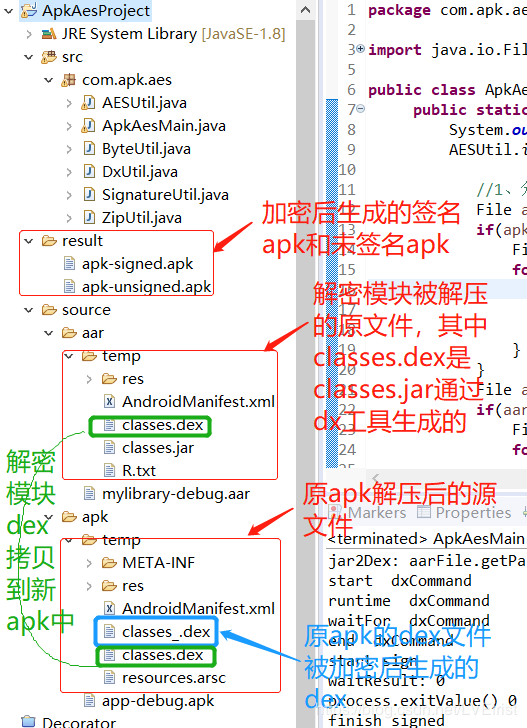
可以看到运行后原apk被加密和解密模块被放到一起重新打包成了新的apk。这个过程代码如何实现呢?
1、既然要加密,必然要选择加密方式,初始化加密算法
    //这里我们选择已封装好的Cipher加密。
    public static final String DEFAULT_PWD = "abcdefghijklmnop";//加密和解密的key要一致,所以解密模块的key也要是同样的。
    private static final String algorithmStr = "AES/ECB/PKCS5Padding";
    private static Cipher encryptCipher;//用来的加密的Cipher实例
    private static Cipher decryptCipher;//用来解密的Cipher实例
    /**
     *  初始化加密算法
     * @param password  这里的password对应DEFAULT_PWD
     */
    public static void init(String password) {
        try {
            // 生成一个实现指定转换的 Cipher 对象。
            encryptCipher = Cipher.getInstance(algorithmStr);
            decryptCipher = Cipher.getInstance(algorithmStr);// algorithmStr
            byte[] keyStr = password.getBytes();
            SecretKeySpec key = new SecretKeySpec(keyStr, "AES");
            encryptCipher.init(Cipher.ENCRYPT_MODE, key);
            decryptCipher.init(Cipher.DECRYPT_MODE, key);
        } catch (NoSuchAlgorithmException e) {
            e.printStackTrace();
        } catch (NoSuchPaddingException e) {
            e.printStackTrace();
        } catch (InvalidKeyException e) {
            e.printStackTrace();
        }
    }
2、加密之前我们需要先创建两个目录用来存放原apk和解密模块压缩出来的源文件
                /**
             * 分别在apk和aar目录下生成两个temp目录用来存放加密的未打包的apk文件
             */
            File apkTemp = new File("source/apk/temp");
            if(apkTemp.exists()) {
                File[] files = apkTemp.listFiles();
                for(File file:files) {
                    if(file.exists()) {
                        file.delete();
                    }
                }
            }
            File aarTemp = new File("source/aar/temp");
            if(aarTemp.exists()) {
                File[] files = aarTemp.listFiles();
                for(File file:files) {
                    if(file.exists()) {
                        file.delete();
                    }
                }
            }
3、解压原apk,并加密原apk中的dex文件。
        /**
          * 解压原apk文件到apk/temp目录下,并加密dex文件
          */
         File sourceApk = new File("source/apk/app-debug.apk");
            File newApkDir = new File(sourceApk.getParent() + File.separator + "temp");
            if(!newApkDir.exists()) {
                newApkDir.mkdirs();
            }
          //解压原apk,加密dex
            AESUtil.encryptAPKFile(sourceApk,newApkDir);
            if (newApkDir.isDirectory()) {
                File[] listFiles = newApkDir.listFiles();
                for (File file : listFiles) {
                    if (file.isFile()) {
                        //修改classes.dex名为classes_.dex,避免等会与aar中的classes.dex重名
                        if (file.getName().endsWith(".dex")) {
                            String name = file.getName();
                            int cursor = name.indexOf(".dex");
                            String newName = file.getParent()+ File.separator +
                                    name.substring(0, cursor) + "_" + ".dex";
                            file.renameTo(new File(newName));
                        }
                    }
                }
            }
什么?没看到解压和加密的核心代码?传送门在这里,自己去看。
4、解压aar文件,并生成壳dex
先解压aar文件,再利用dx工具将解压出来的classes.jar文件转换成壳dex,并拷贝到新apk的源目录下
            /**
             * 解压aar文件(不能进行加密的部分),再利用dx将jar转换成dex,并将dex文件拷贝到apk/temp中来
             */
            File aarFile = new File("source/aar/mylibrary-debug.aar");
             File sourceAarDex = null;
            try {
            //解压aar文件,并通过dx工具将jar文件转换成dex文件
                sourceAarDex  = DxUtil.jar2Dex(aarFile);
            }catch(Exception e){
                e.printStackTrace();
            }

            File copyAarDex = new File(newApkDir.getPath() + File.separator + "classes.dex");
            if (!copyAarDex.exists()) {
                copyAarDex.createNewFile();
        }
            //拷贝aar/temp中的classes.dex到apk/temp中
            FileOutputStream fos = new FileOutputStream(copyAarDex);
            byte[] fbytes = ByteUtil.getBytes(sourceAarDex);
            fos.write(fbytes);
            fos.flush();
            fos.close();
想看如何通过dx工具将jar转换成dex的核心代码?
 public static void dxCommand(File aarDex, File classes_jar) throws IOException, InterruptedException {
            Runtime runtime = Runtime.getRuntime();
            //这里需要注意,commond中dx需要配置环境变量后才可以这样写,否则需要指定dx.bat的绝对路径
            String commond = "cmd.exe /C dx --dex --output=" + aarDex.getAbsolutePath() + " " +classes_jar.getAbsolutePath();
            Process process = runtime.exec(commond);
            System.out.println("runtime  dxCommand");
             process.waitFor();
             System.out.println("waitFor  dxCommand");
            } catch (InterruptedException e) {
               System.out.println("InterruptedException  dxCommand");
                e.printStackTrace();
                throw e;
            }
            if (process.exitValue() != 0) {
                 System.out.println("getErrorStream  dxCommand");
                InputStream inputStream = process.getErrorStream();
                int len;
                byte[] buffer = new byte[2048];
                ByteArrayOutputStream bos = new ByteArrayOutputStream();
                while((len=inputStream.read(buffer)) != -1){
                    bos.write(buffer,0,len);
                }
                    //输出出错信息
                System.out.println(new String(bos.toByteArray(),"GBK"));
                throw new RuntimeException("dx run failed");
            }
            process.destroy();
        }
5、一切就绪,打包apk/temp目录生成新的未签名apk文件
 File unsignedApk = new File("result/apk-unsigned.apk");
 unsignedApk.getParentFile().mkdirs();
 ZipUtil.zip(newApkDir, unsignedApk);
6、给加密后组合压缩成的新apk文件重新签名
File signedApk = new File("result/apk-signed.apk");
SignatureUtil.signature(unsignedApk, signedApk);
我们继续看看这个签名是个什么黑科技:
/**
     * 为加密后的apk文件添加签名
     * @param unsignedApk
     * @param signedApk
     * @throws InterruptedException
     * @throws IOException
     */
       public static void signature(File unsignedApk, File signedApk) throws InterruptedException, IOException {
            String cmd[] = {"cmd.exe", "/C","jarsigner",  "-sigalg", "MD5withRSA",
                    "-digestalg", "SHA1",
                    "-keystore", "C:/Users/cizongfa/.android/debug.keystore",
                    "-storepass", "android",
                    "-keypass", "android",
                    "-signedjar", signedApk.getAbsolutePath(),
                    unsignedApk.getAbsolutePath(),
                    "androiddebugkey"};
            Process process = Runtime.getRuntime().exec(cmd);
            System.out.println("start sign");
            try {
                int waitResult = process.waitFor();
                System.out.println("waitResult: " + waitResult);
            } catch (InterruptedException e) {
                e.printStackTrace();
                throw e;
            }
            System.out.println("process.exitValue() " + process.exitValue() );
            if (process.exitValue() != 0) {
                InputStream inputStream = process.getErrorStream();
                int len;
                byte[] buffer = new byte[2048];
                ByteArrayOutputStream bos = new ByteArrayOutputStream();
                while((len=inputStream.read(buffer)) != -1){
                    bos.write(buffer,0,len);
                }
                System.out.println(new String(bos.toByteArray(),"GBK"));
                throw new RuntimeException("签名执行失败");
            }
            System.out.println("finish signed");
            process.destroy();
        }
更多Android高级架构进阶视频学习请点击:https://space.bilibili.com/474380680
原文链接:https://blog.csdn.net/LVEfrist/article/details/101061370

![jenkins构建自由风格项目[四]](https://yqfile.alicdn.com/img_706b7fc7ab3f3a6296f0777ba864a3d0.png)